ReactJS with SharePoint

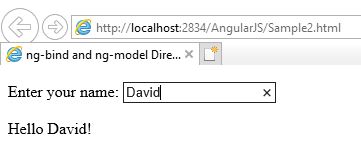
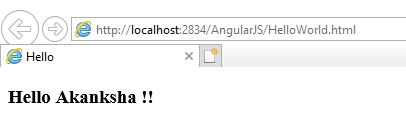
Let’s see how ReactJS works with SharePoint. This is a sample ReactJS example which displays Hello React!! in the Script Editor Web Part.

Open and Edit the page in which you want to add the ReactJS code.
Add Script Editor Web Part and copy below code in that

<script src="https://unpkg.com/react@16/umd/react.development.js"></script>
<script src="https://unpkg.com/react-dom@16/umd/react-dom.development.js"></script>
<script src="https://unpkg.com/babel-standalone@6.15.0/babel.min.js"></script>
<div id="root"></div>
<script type="text/babel">
ReactDOM.render(
<h1>Hello ReactJS!</h1>,
document.getElementById('root')
);
</script>

Below is the output in the WebPart:

You can also go with the below code that will create a separate custom element:

<script src="https://unpkg.com/react@16/umd/react.development.js"></script>
<script src="https://unpkg.com/react-dom@16/umd/react-dom.development.js"></script>
<script src="https://unpkg.com/babel-standalone@6.15.0/babel.min.js"></script>
<div id="root"></div>
<script type="text/babel">
class App extends React.Component {
   render() {
      return (
         <div>
            Hello World!!!
         </div>
      );
   }
}
ReactDOM.render(
<App />,
document.getElementById('root')
);
</script>

ReactJS Environment Setup

ReactJS is a front-end library developed by Facebook. It handles the View layer of web and mobile applications. We can also create reusable UI components.

We need NodeJS platform for ReactJS application development. You can setup the NodeJS development environment from here. We will use npm (Node Package Manager) to create our applications.

Npm command has many sub-commands associated with it.

  • Open NodeJS Command Prompt.
  • Navigate to the folder where you want to store your ReactJS Application.
  • You can use normal Command Prompt commands to navigate to directories and folders. Execute the following command.
npm install -g create-react-app


Let’s understand the above command deeply. (npm install -g <name of the package>) In this case, we use npm to download a package, say create-react-app, and install is globally on our local computer.

      • npm: It runs npm (Node Package Manager)
      • install: installs a package onto our computer. This is a sub-command of npm
      • -g: This is a flag which installs the package globally on our computer so that we can run it from the terminal
      • name of the package: Name of the package we want to install. In the above command, we want to install create-react-app package.
    • Now we use this package to create a react application. USE ONLY LOWERCASE LETTERS FOR APP NAMES. Command to create a react app: create-react-app <app_name>
      create-react-app myfirstapp

  • In the above image, you can see that when we created the app, it has automatically added 1326 packages (this number can change in your environment).
    • These packages also include Webpack, Babel and Webpack Dev Server. These are behind the scene libraries that we do not have to manually create and are automatically created.
    • Babel is a toolchain that is mainly used to convert ECMAScript 2015+ code into a backwards compatible version of JavaScript so that they can be supported by all browsers. Kindly note that ECMAScript2015+ versions are not fully supported by all browsers, hence the conversion by Babel is necessary.
  • Now, it is asking us to navigate to the newly created folder and execute npm start command.
    • Command to start the React App: npm start
    • Command to stop the React App: Ctrl + C
  • As soon as I press enter, it will start the server automatically on port 3000. Application will be started in the default browser and following page will be displayed.

    • Even if you close the browser, the application is still be running. You can type http://localhost:3000/ in the browser to open the application again. To close the application, type Ctrl+C on the terminal(command prompt).
    • After Ctrl+C, you will not be able to open the application in the browser until you start the application again from the terminal from the project directory. You cannot start the application just from anywhere.
  • Let’s open our ReactJS folder in C drive. You will find a folder named myfirstapp. Open this folder and you will find below folder structure. NOTE that the structure and content may change based on the React version you are using.
  • This have three folder here
    • src: This will have all the .css and .js files. This is the place where we keep all the source code we write.
    • public: This will have index.html file which is the home page of your application. Apart from this, we also store all the static files like images here.
    • node_modules: This folder will have all of our project dependencies that we have installed. You can see webpack, babel, webpack-dev-server etc here in this folder. It is created automatically when you create a project. DO NOT modify the content of this folder manually.

  • App.js: contains all the data that is displayed in index.html file. This will create a reusable element.
  • index.js: This will import the <App/> component from App.js file and display it in HTML element with id=”root” in index.html file.
  • Other files that are created:
    • package.json: This will record the project dependencies and configuration related information of the project.
    • package-lock.json: This will record the exact version of packages that we install.
    • README.md: This will have the instructions on how to use the project.
    • .gitignore: This file is a reference to the get version control system and essentially it lists out the different files and folders that get should ignore if it’s going to be tracking our project and maintaining a record of all different changes we are making to our code.

Create Footer for your WebSite

Below is the example to create footer for the website. The Feedback & Suggestions and FAQs are links.

<style>
.right{
    float:right;
    color:white;
}
.left{
    float:left;
    color:white;
}
p#footer{
height: 20px;
background: black;
background: rgba(0, 0, 0, 0.9);
font-family: arial;
font-size: 15px;
padding:10px;
}
a{
    color:white;
    text-decoration: none;
}
a:visited{ color: white; text-decoration: none;}
a:hover{ color: white; text-decoration: none;}
a:active{ color: white; text-decoration: none;}
</style> 

<p id="footer"> 
   <span class="left">​​​​​<a href="https://tutorials4sharepoint.wordpress.com/" target="_blank">Feedback &amp; Suggestions</a> | 
      <a href="https://tutorials4sharepoint.wordpress.com/" target="_blank">FA​Qs</a> </span>
   <span class="right">&copy; All Right Reserverd.​​​​​​​​</span> 
</p>
 

Below is how this footer will look like:

If you want the links to have an underline and change color when visited, just remove text-decoration style and change other attributes of anchor tag.

ng-model and ng-bind Directive

ng-model Directive binds the value of AngularJS application data to HTML input controls.
ng-bind Directive tells AngularJS to replace the text content of HTML element with the value of the given expression, and to update the text content when the value of that expression changes.

Below is the sample code:

<!DOCTYPE html>
<html xmlns="http://www.w3.org/1999/xhtml">
<head>
    <script src="https://ajax.googleapis.com/ajax/libs/angularjs/1.3.14/angular.min.js"></script>
    <title>ng-bind and ng-model Directives</title>
</head>
<body ng-app="">
        <p>Enter your name: <input type="text" ng-model="name"/></p>
        <p>Hello <span ng-bind ="name"></span>!</p>
</body>
</html>

Below is the output of the above code when you run it in Internet Explorer.

Whenever you write something in textbox, the text after Hello automatically starts changing.

ng-init and ng-repeat Directive

ng-repeat Directive is used to repeat an HTML element for each item in the collection.
Below is a sample code for ng-repeat directive. I have used Visual Studio to write this code.

<!DOCTYPE html>
<html xmlns="http://www.w3.org/1999/xhtml">
<head>
    <script src="https://ajax.googleapis.com/ajax/libs/angularjs/1.3.14/angular.min.js"></script>
    <title>ng-repeat Directive</title>
</head>
<body ng-app="">
    <div ng-init="contacts=[{name: 'William', phone:'9876543210'},{name:'John', phone:'7777666543'},{name:'Mike',phone:'7778456734'}]">
        <p>Below are the list of Contacts:</p>
        <ol>
            <li ng-repeat="contact in contacts">
                {{'Name: ' + contact.name + ', Phone: ' + contact.phone}}
            </li>
        </ol>
    </div>
</body>
</html>

Below is the output of the above code:

Sample AngularJS Application

Below is the sample code for AngularJS Application:

<!DOCTYPE html>
<html xmlns="http://www.w3.org/1999/xhtml">
<head>
    <script src="https://ajax.googleapis.com/ajax/libs/angularjs/1.5.2/angular.min.js"></script>
    <title>Hello</title>
</head>

<body ng-app="myapp">

    <div ng-controller="HelloWorldController">
        <h3>Hello {{hello.title}} !!</h3>
    </div>

    <script>
        angular.module("myapp", [])
        .controller("HelloWorldController", function ($scope) {
            $scope.hello = {};
            $scope.hello.title = "Akanksha";
        });
    </script>
</body>
</html>

Below is the output of the above code when run in Internet Explorer. You can also use any other browser.

In the above code, we have first included the reference file to AngularJS in the HEAD section so that we can use it in our HTML page.

<head>
   <script src="https://ajax.googleapis.com/ajax/libs/angularjs/1.5.2/angular.min.js"></script>
   <title>Hello</title>
</head>

To bind HTML page to AngularJS, we have to include ng-app directive either in HTML tag or BODY tag. This helps HTML document to locate where AngularJS cod is located. Here we are creating an angular module named myapp.

<html ng-app = "myapp"></html> // OR
<body ng-app = "myapp"></body>

This is the View part of the AngularJS application that is displayed on HTML page and all HTML tags are included in this part. ng-controller tells AngularJS which controller to use with the current view. hello.title tells AngularJS to write the “model” value named hello.title to the HTML at this location.

<div ng-controller="HelloWorldController">
<h3>Hello {{hello.title}} !!</h3>
</div>

This is the Controller part of AngularJS application. This code registers a controller function HelloWorldController in myapp module. The controller function is registered in angular via angular.module().controller() function.

<script>
        angular.module("myapp", [])
        .controller("HelloWorldController", function ($scope) {
            $scope.hello = {};
            $scope.hello.title = "Akanksha";
        });
    </script>

The $scope parameter passed to the controller function is the model. The controller function adds a hello JavaScript object, and in that object it adds a title field.

AngularJS Introduction

AngularJS is a JavaScript Framework to create Single Page Application projects. It basically extends the existing HTML DOM elements and make them more responsive to user actions. It is open source and completely free.

Before learning AngularJS, you should have the basic knowledge of HTML, CSS, JavaScript and any Web Development text editor say Visual Studio or any other.

Some features of AngularJS are as follows:

  • It uses JavaScript as the Framework to develop Client-Side Applications.
  • AngularJS applications are cross-browser compliant.
  • It is free and open source.
  • It is Unit Testable.
  • Provides reusable components.
  • It follows MVC(Model, View, Controller) model.

Few definitions in AngularJS:

  • Scope: These are the objects that refer to the model. They act as a bridge between controller and view.
  • Controller: These are JavaScript functions that are bound to a particular scope.
  • Filters: These selects a subset of items from an array and returns a new array with the selected item.
  • Directives: They are markers on DOM elements like elements, attributes, CSS etc. They are used to create custom HTML tags. There are many built-in directives available like ng-app, ng-model, ng-bind etc.

AngularJS main directives:

  • ng-app: This directive defines and links an AngularJS application to HTML page.
  • ng-model: This directive binds the values of AngularJS application data to HTML input controls.
  • ng-bind: This directive binds the AngularJS application data to HTML tags.

For list of other directive, please click here.

Setup the Environment

Download AngularJS from here.

Node.js Environment Setup

Below are the steps to setup the environment of Node.js on Windows:

    • We need two softwares to develop Node.js applications: Text Editor and Node.js binary installables.
    • Text Editor can be a Windows Notepad. We need to write our code in Notepad and save the file with .js extension.
    • The source code is simply JavaScript code.
    • We can install the latest version of Node.js from here. You can find the links for various Operating Systems and for 32-bit/64-bit operating systems.
    • For Windows, an .msi file will be downloaded. You can run the setup and install the software. By default, it will be installed at C:\Program files\nodejs location.
    • Now write the following code in a NotePad and save that file with the name hello.js. Let’s say you have saved this file at
      console.log("Hello, World!")
      
    • Open the Command Prompt on Windows and write the following code.
  • When you press Enter, you will see Hello, World! written on Command Prompt.

Congrats! You have just created your first NodeJS application.

JavaScript Functions

Functions are a piece of code that are created to perform a particular functionality. They are written once and can be used anywhere and multiple times. Hence, there is no need to write the same code again and again. Through functions, we can divide the code into smaller functions.

Functions are defined by the keyword function, followed by a unique name, list of parameters (optional) followed by block of code in curly braces. Below is the syntax of JavaScript functions:

function function_name(parameter1, parameter2, parameter3,…) {
statement1;
statement2;
.
.
.
}

Below is an example of how to write a basic JavaScript function. This function has no parameters.

       
function hello() {
alert("Hellooozzzz");
}

But writing this function is of no use until we call it which is known as Invoking of a Function. Below is the complete code to create and invoke a function.

In the above example, we have created a function with the name hello which has zero parameters. In our HTML page, we have a button Click Me!. When we click this button, our hello function is invoked and you will see an alert box with the message Hellooozzzz written on it.

When a function is invoked, the statements within it are executed. We can declare various types of variables in it, use conditional and loop statements as well in that.

Passing Parameters

There are two terms used in functions: Arguments and Parameters. Parameters are the names that are listed in function definition. Arguments are the real values that are passed to the function when they are called.

Let’s see an example where we pass parameters to a function. You can pass one or more parameters to the function separated by comma(,). But the number of parameters should match in function definition and when function is invoked.

Below is an example:

In the above example, we have created a function calculateEvenOrOdd which takes one parameter. We have placed a textbox and a button on our HTML page which has a label “Even OR Odd”. We enter a number in the textbox and click the button to know whether the the number is even or odd. On click of the button, the number is passed to the function as an argument, the result is calculated and displayed in an alert box through function.


Break and Continue in JavaScript

There are few statements that are used to control loops and switch statements. These statements are used to continue or come out of the loops or switch statement irrespective of the condition. break and continue statements are used to come out of the loop or continue with the next iteration irrespective of the condition.

break

break statement is used to come out of the loop or switch statement early, and execute the next statement after the closing curly braces.

Below is an example for break statement:

for(i=1; i&lt;=10;i++)
{
if (i == 6)
break;
document.write(i + "&lt;br/&gt;");
}
document.write("Exited the loop!");

Output of the above example is:
1
2
3
4
5
Exited the loop!

From the above example and its output, you can see that the control has stopped executing the for loop when the i was equal to 6 and came out of the loop to execute the next statement.

continue

continue statement is used to skip the current iteration and start with the next iteration till the condition is true.

Below is an example for continue statement:

for(i=1; i&lt;=10;i++)
{
if (i == 6)
continue;
document.write("Inside Loop: " + i + "&lt;br/&gt;");
}
document.write("Outside Loop!");

Output of the above example is:
Inside Loop: 1
Inside Loop: 2
Inside Loop: 3
Inside Loop: 4
Inside Loop: 5
Inside Loop: 7
Inside Loop: 8
Inside Loop: 9
Inside Loop: 10
Outside Loop!

You can see from the above example and its output that it has skipped the iteration when i was equal to 6 and continued with the next iteration till the condition is true.

Power Platform Academy

Start or Upgrade your Career with Power Platform

Learn with Akanksha

Python | Azure | AI/ML | OpenAI | MLOps

Design a site like this with WordPress.com
Get started