- We can control the access and visibility of data members of a class to the data members of other class using Access Modifiers.
- Hence, we can restrict the usage of data members of a class outside of its scope.
- This phenomena is known as Data Hiding or Encapsulation.
- This concept is used with Inheritance in Classes.
| Access Modifier | Description |
|---|---|
| public | We can access these data members from anywhere within our program. By default, all the data members are public. |
| private | We can access these data members only from within the scope of the class. If we try to use them from outside, it will throw an error. |
| protected | These data members can be used from within the scope of the class in which it is defined, and also from its child classes. |
Below is an example to illustrate the access modifiers
class ParentClass {
    pubStr:string;
    private prvStr:string;
    protected protStr:string;
 }

 class ChildClass extends ParentClass {

    display():void {
       console.log("\nDisplay method in Child Class!");
       //this.prvStr = "Private Data Member";
       this.protStr = "Protected Data Member in Child Class";
       console.log(this.pubStr);
       console.log(this.protStr);
    }
}
var childObject = new ChildClass();
childObject.pubStr = "Public Data Member in Child Class";
//childObject.protStr = "Protected data Member";
//childObject.prvStr = "Protected data Member";
childObject.display();
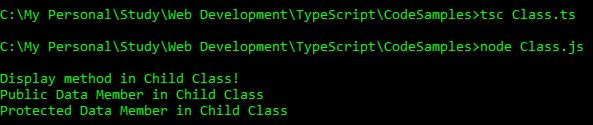
Below is the output of above code
Below are the errors if we try to access private and protected data members outside of their scope. I have put comments in the above code. I will be removing these comments and will show you the error message in a screenshot.
Let’s see the error messages after removing the comments of the private access modifiers.

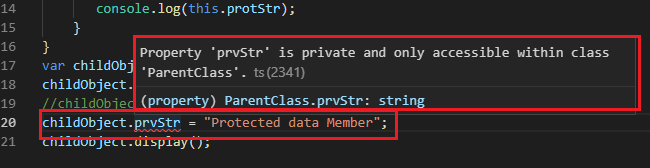
We cannot access private data members from anywhere outside of that class.
Let’s see the error messages after removing the comments of the protected access modifiers.
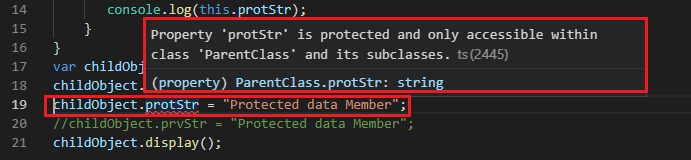
We can access the protected data members from within the child class only.