Detail Screen in Power App

In Create Power Apps for SharePoint List, I have explained the Detail Screen in brief. Let’s explore it more.

  • This screen will show complete details of the item selected from the Browse Screen.
  • You can Edit or Delete the item from this page as well.
  • Note that in Browse Screen, we are able to see data from 3 fields, but in Detail Screen, you will be able to see all the data.
  • In the below screen, you can see Delete and Edit icons at top right corner of the screen and Back icon at top left corner of the screen.
  • When you click on Delete icon, the item will be deleted from the list and you will be redirected to Browse Screen.
  • When you click on Edit icon, you will be redirected to Edit Screen where you can Edit the item.
  • When you click on Back icon, you will be redirected to Browse Screen.
  • Items property of DetailForm is BrowseGallery1.Selected. That means, it will show the details of the item that is selected from BrowseGallery1 present in Browse Screen.
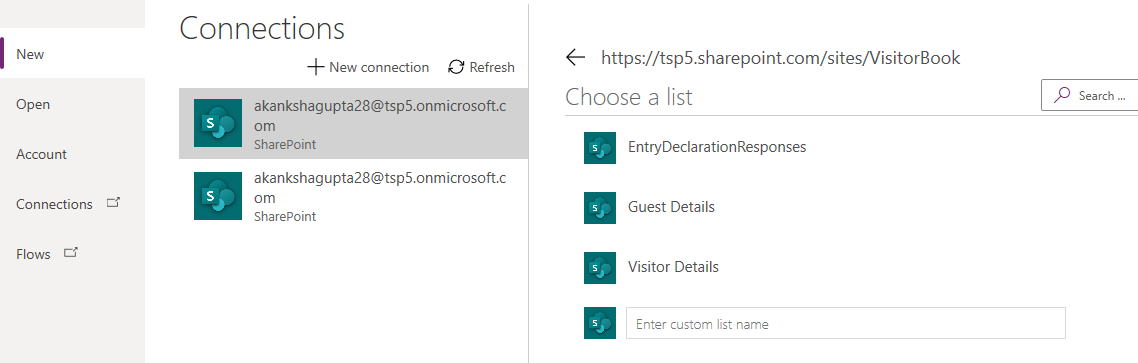
  • DataSource should be your actual data source from where you are getting the data like SharePoint List Name

This Detail Screen is divided into Data Cards which are locked and cannot be edited. THE MOST IMPORTANT thing to note here is that if you want to change the properties of these cards like Data Field, Display Name, Required, Default Value etc., you need to unlock them. Once you unlock them, you cannot lock them back. Double click on Unlock to change properties to unlock the card and change it’s properties.

Below is the list of properties that you can modify if the card is locked in Detail Screen:

Other Related Posts

Browse Screen

Save and Open Power App

When you create an app, save it and give a name to it so that you can open it later and continue your work.

Click on File –> Save or Save As.

Give a name for your app and save it. I gave it name: GuestRegistration

Click on Save once done.

If you want to open your App again, Click on Open and select your app and open it.

Refresh Power App Data Source

Whenever you make any changes in the SharePoint List, the changes will not automatically appear in the Power App. You need to refresh the Data Source to reflect the changes. Below are the steps to do that same:

  • Go to View tab
  • Click on Data Source
  • Click on three ellipses () of the Data Source that you want to refresh
  • Click on Refresh

Change color of the text in Power Apps

Let’s continue with our app from Create Power App for SharePoint List article.

We are using SharePoint List named Guest Details as the Data Source:

I have added one more column to out Guest List: Color which is of Single line of Text. Remember to Refresh the Data Source of Power App to reflect this change.

We have Color property in almost all the controls which we can use to set the color for our available fields.

By Default, Color has the value of RGBA(0,0,0,1), but you can also set the value using ColorValue.

Select the field for which you want to change the color. Select Color property from the Properties Drop Down at the top left corner of the screen. You will see more properties in this Drop Down, hence this is very important. You need to set it once and it will be applied to that field for all the items.

ThisItem is very important as it takes the current item which you are working on.

In, Color is a column in the SharePoint List which has color values.

The ColorValue function returns a color based on a color string in a CSS. It can take a value in String i.e., the color name, 6-digit hex value or 8-digit hex value.

In this article, I have modified the Color property of all the three fields: Title, Subtitle and Body.

You can also give RGBA value for Color property of an item:

Browse Screen in Power App

In Create Power Apps for SharePoint List, I have explained the Browse Screen in brief. Let’s explore it more.

Open your existing app in Power Apps.

Layouts

Select the layout of the form from the Layouts Drop Down. By default, it is Title, Subtitle and Body. You can select other layouts from the drop down. If you scroll down in the drop down, you will see a gallery to organize the Browse screen in columns.

Fields

Once you select the layout, you can edit the fields that you want to display in the Browse Screen. Click on Edit in Fields section. The option that you get will be based on the layout selected. You can select the SharePoint List column from the drop downs.

Create Power App for SharePoint List

Once you click on Connect, you will see all the default screens like Browse Screen, Detail Screen and Edit Screen. You can modify these screens as per your requirement. There is a Preview button at the top right corner of the screen. Click on it to preview the app.

I have created a SharePoint List named Guest Details with columns: Guest Name, Guest Address, Guest Phone and Occupation. I have also added some random data into it.

Browse Screen
  • This screen shows the overview of the list items that are there in the list.
  • You can see the details of these items by clicking on the arrow beside them. This arrow will take you to Detail Screen.
  • On click of Refresh icon, the data in this screen will be updated with the latest data from the SharePoint list.
  • Sort icon will sort the list on the basis of main Title, which in our case is Guest Name.
  • + icon is the Add item icon. User can add a new item in the list using this icon. Click on Check icon to save the item or on Cross icon to cancel it. Once done, you will be redirected to Browse Screen.
  • Go to Browse Screen in Power Apps for more details. Here you will see how to change the layout of the Browse Screen and the fields that are there.
Detail Screen
  • This screen will show complete details of the item selected.
  • You can Edit or Delete the item from this page as well.
  • Note that in Browse Screen, we are able to see data from 3 fields, but in Detail Screen, you will be able to see all the data.
  • In the below screen, you can see Delete and Edit icons at top right corner of the screen and Back icon at top left corner of the screen.
  • When you click on Delete icon, the item will be deleted from the list and you will be redirected to Browse Screen.
  • When you click on Edit icon, you will be redirected to Edit Screen where you can Edit the item.
  • When you click on Back icon, you will be redirected to Browse Screen.

Go to Detailed Screen for more information.

Edit Screen

This will load the data of the selected item in the fields. You can make the required changes. Once done, click on Check icon to save the changes in SharePoint list or Cross icon to discard the changes. You will be redirected to Details Screen.

Congratulation! You have just created your first Power App with all the functionalities like Add, Update, Delete and Read functionalities.

Other References:

Previous

Connect to SharePoint List

Next

Save your Power App

Connect to SharePoint List

I have logged in to https://create.powerapps.com.

I want to create a Power App using data from SharePoint. Click on Phone Layout for SharePoint.

Choose the Connection and SharePoint site to which you want to connect. If you are not able to see your SharePoint site URL in the list, type the Site Collection URL and click on Go.

Create a new connection if you do not have a connection.

Once you select the site, you will the SharePoint Lists that are available in the selected Site Collection. Please note that this will display only SharePoint Lists and not the Libraries. If you are not able to see the name of the SharePoint list here or you want to connect your App to SharePoint Library, enter its name. Click Connect once done.

I have chosen Visitor Book site Collection and Guest Details SharePoint List.

Previous

Choose Power Apps Template

Next

Create Power App for SharePoint List

Choose Power Apps template

Let’s start with Power Apps.

I have created a SharePoint List named Guest Details with columns: Guest Name, Guest Address, Guest Phone and Occupation. I have also added some random data into it.

To create Power Apps, open this link in browser https://make.powerapps.com. If you already have an account, use that to login or you can also create a new one for trial purpose.

Once you login to Power Apps, click on Add –> New. Choose the type of App that you want to create.

Let’s choose Canvas. You will be navigated to a page to choose the layout of your app: Mobile or Tablet. Enter the name of the app as well. Click on Create once done.

You will be navigated to a window from where you can start creating an app from scratch.

OR

Click on https://create.powerapps.com. You will be redirected towards Power Apps studio.

From here, you can choose the data that you want or the layout that you want. You can create a blank app and choose between Tablet or Phone layout or you can choose a data connection and create a Mobile layout.

This will give you few screens that are ready: Browse Screen, Detail Screen and Edit Screen. I am choosing this one as of now.

Next

Connect to SharePoint List

No Item to Display in Power Apps

I have created a form in Power Apps and linked it’s Data Source to a SharePoint list.

But when I run this form using Run button from top-right corner, it displays the message No item to display OR Data Source May Be Invalid.

For this, select the Form that you want to run. See it’s Item property. It should be blank or will have some invalid value. it should have value in below format:

Defaults('SharePoint list name')

Now try to run. It will run as expected.

Add Data Source in Power Apps

Few months ago, we were able to add data source by clicking on View Tab –> Data Sources. Then there used to appear an Add a Connection window on right-hand side from where new data sources can be added. But that is now missing.

But that window is gone now. When we click on View -> Data Sources, we see the lists of connections that we have and not an option to add a new data source.

There is now a new way to add a new data source.

For example, I want to add a new SharePoint connection. Type SharePoint in Search box. You will see a SharePoint Connection.

Once you click on Add a connection, You will get a window to select connection to cloud services or to on-premises data gateway.

You can enter a site collection and list for the connection.

Power Platform Academy

Start or Upgrade your Career with Power Platform

Learn with Akanksha

Python | Azure | AI/ML | OpenAI | MLOps

Design a site like this with WordPress.com
Get started