Send Email from PowerApps Button

In this article, we will see how to send an email from a PowerApp. We will use SharePoint list for this app. Let’s say we want to send birthday wishes to our team members on their email.

Create a SharePoint List

Create a new SharePoint list in SharePoint Online which will have details of the employees. Create new columns and rename Title column with EmployeeId. Enter some dummy data in it. Below is a snapshot of my list.

Create PowerApp

Login to PowerApps (https://web.powerapps.com) with your credentials. You will see the below screen when you first login.

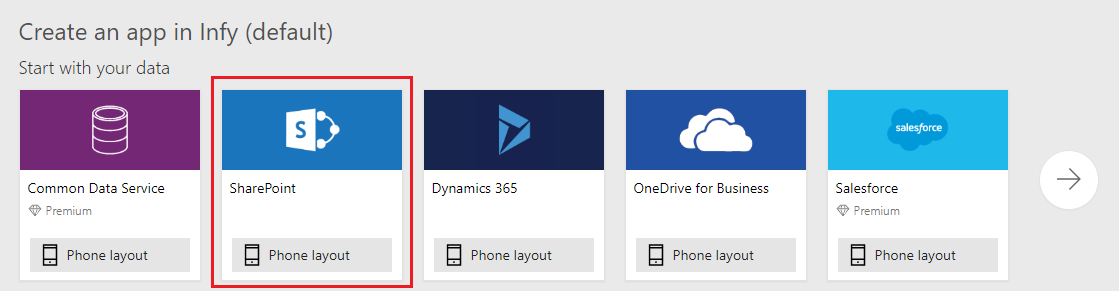
Click on Apps on left navigation bar. Choose Create an app. Click on Canvas.

A new window will open. I am using SharePoint List to create this PowerApp, hence will choose SharePoint. Click on Phone Layout.

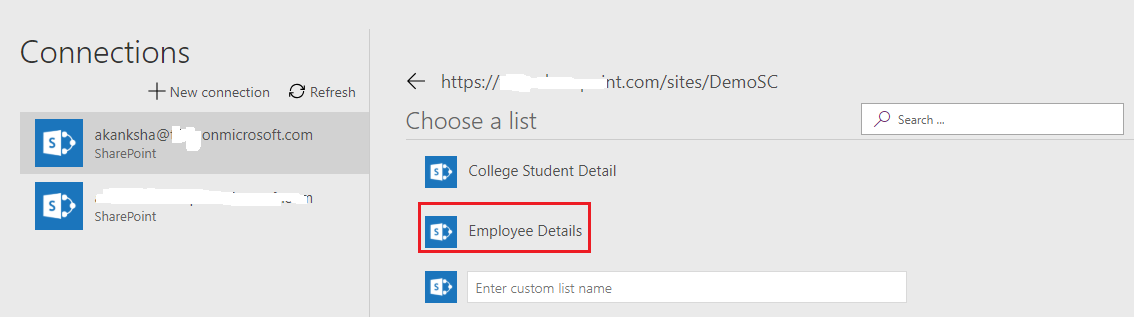
You will be redirected to a Connections page where you will need to create a connection and then choose a SharePoint site collection from which you want to fetch the data. In the below diagram, on the left side you can see the list of existing connections. If your connection does not exist here, click on New Connection to create a new connection.

When you select a connection, a list of recently used site collection appear on the right side. If you are not able to see your site collection, enter the Site Collection URL and click on Go.

When you select a Site Collection, you will see a list of exiting Lists. You can now choose a List. If your list name does not exist, enter the name manually in the given text box. I will be choosing Employee Details here. Once selected, click on Connect on bottom right corner of the screen.

You will see below screen.

  • To see the working of the app, click on Play button on top right corner of the app.
  • On the left pane, you can see the controls and the screens that are available on the app. Here, you can see Browse Screen, Detail Screen and Edit Screen. Click on each to see their details.
  • On the Center, you can see the app on which you can do the modifications.
  • On the right side, You can see the settings for each selected item of the app.
  • On the top, there is a function bar where you can create functions for a selected control.
  • Apart from this, there is a Menu bar (File, Home, Insert, View, Action) with multiple options which we can use throughout our app.
Add buttons and other fields

Select DetailForm1 from left panel. Click on Edit Fields from the right pane.

Once you click Edit Fields, A new window will popup. Click on three dots, the on Add a custom card.

Expand the data card. Click on Insert Menu, Select Button and Text Boxes and place them on the card in the below fashion. You can also rename them from the left panel.

In the text boxes, you can see a text written. This is a HintText which is written to let the user know what to type here. Select the control, then select HintText from the drop down and type the text in double quotes. You can also set some default text if you want.
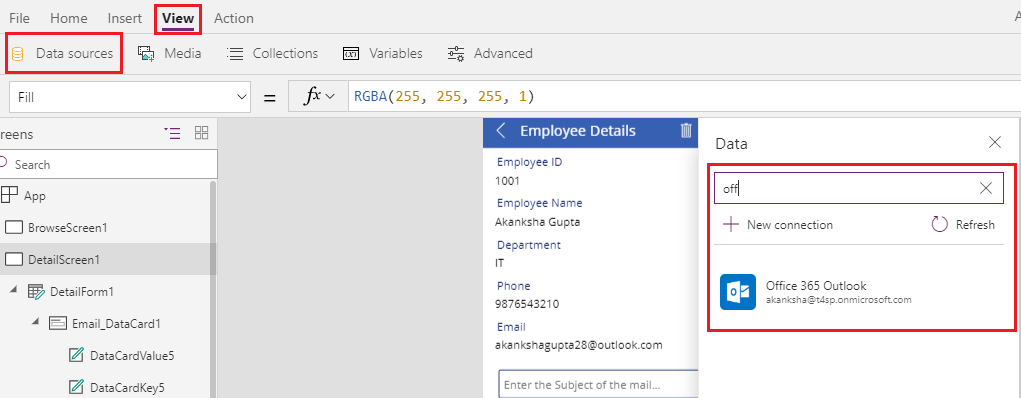
Add a Data Source

As we want to send an email when we click on a button, we have to add a data source of Office 365. Click on View menu –> Data Sources. Click on Add data source. Select Office 365.

NOTE: If you are not able to add data source using this method, click here to see new steps to add a data source in your Power App.

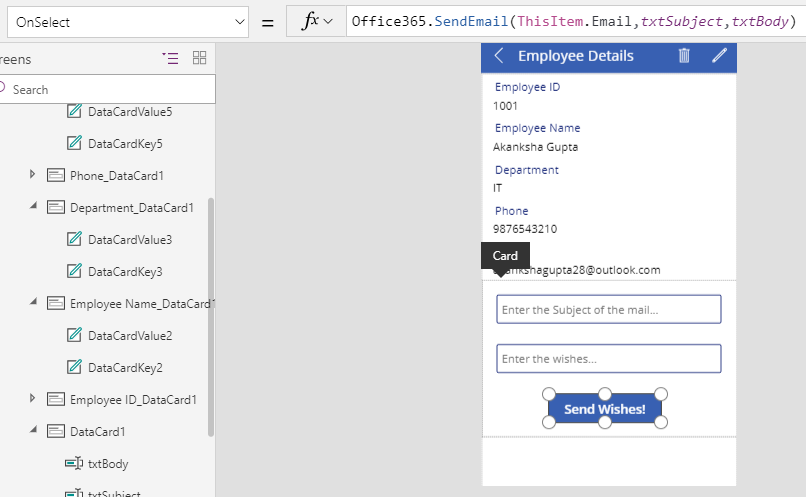
Write the Send Email formula

  • Now select the button, and write a formula on formula bar.
  • First Parameter is To. We will pick the Email ID from the current item’s Email column.
  • Second Parameter is Subject. We will pick this from the textbox that we have created, txtSubject.
  • Third Parameter is Body. We will pick this from the textbox that we have created, txtBody.
  • If you put comma after this, you will get other options to add attachments, CC or BCC.

Test the PowerApp

Select the BrowseScreen1 from the left pane and select Play button from the top right corner of the screen. You will see the data from the SharePoint List. Select one of the contacts and write your wished and click on the button.

The mail will be received in the mailbox.

Canvas PowerApps in Microsoft Teams

PowerApps are closely integrated in Microsoft Teams. Create a Microsoft Team and add PowerApps in that.

Below are the steps to create PowerApps in Microsoft Teams.
Open a Channel in Microsoft Team in which you want to add PowerApps.
In this example, it is General channel. Click on + button.

Search for PowerApps.

Filter for Sample Apps. I have selected Contacts from the available Sample Apps.

Allow for any permission that it asks for.

This is how a PowerApp is added in Microsoft Team.

What are PowerApps?

As per Microsoft, PowerApps is a suite of apps, services, connectors and data platform that provides a rapid application development environment to build custom apps for your business needs. Using PowerApps, you can quickly build custom business apps that connect to your business data stored either in the underlying data platform (Common Data Service for Apps) or in various online and on-premises data sources (SharePoint, Excel, Office 365, Dynamics 365, SQL Server, and so on).

PowerApps have a responsive design, and can run seamlessly in browser or on mobile devices (phone or tablet).

PowerApps allows developers and non-technical users to build applications from available templates. To create PowerApps, users need not to have developer expertise. Microsoft has introduced a visual design for PowerApps with drag-and-drop functionality with a familiar look of PowerPoint.

PowerApps can connect to various Microsoft-based and third-party applications, like Microsoft SQL Server, SharePoint, Dropbox, Google Docs, SAP, Oracle and Dynamics CRM etc.

Using PowerApps, you can create two types of apps: Canvas and model-driven.
To create an app, you start with web.powerapps.com.

  • Canvas Apps give you a lot of control over the user experience of the app. An app maker can use templates to create a canvas app, or they can configure the app any way they like. A canvas app, like its name, is a blank canvas, so you can create an app to fit the needs of users in your organization.
  • Model-driven apps uses UI that provides a responsive and accessible design. You can run the app on a web browser or on popular mobile devices. The app has multiple components including dashboards, forms, views, charts, and business processes that together help make the app easy to use. Model-driven apps are built and modeled on the Microsoft Dynamics 365 Customer Engagement framework, so the user experience is similar to Dynamics 365 Customer Engagement apps.
Create PowerApps using
  • PowerApps Studio is the app designer used for building canvas apps. The app designer makes creating apps feel more like building a slide deck in Microsoft PowerPoint.
  • App designer is for model-driven apps that lets you define the sitemap and add components to build a model-driven app.
PowerApps admins

They can use:

  • PowerApps Admin Center: admin.powerapps.com is used to create and manage environments, user roles and data-loss prevention policies. Click here for more details.
  • Power platform admin center: admin.powerplatform.microsoft.com to manage environments, get real-time, self-help recommendations and support for Dynamics 365 Customer Engagement, PowerApps, and Microsoft Flow, and view CDS for Apps analytics. Click here for more details.
PowerApps Developers

They are app makers who can write code to extend business app creation and customization. Developers can use code to create data and metadata, apply server-side logic using Azure functions, plug-ins, and workflow extensions, apply client-side logic using JavaScript, integrate with external data using virtual entities and webhooks, build custom connectors, and embed apps into your website experiences to create integrated solutions. More information: PowerApps for developers

Power Platform Academy

Start or Upgrade your Career with Power Platform

Learn with Akanksha

Python | Azure | AI/ML | OpenAI | MLOps

Design a site like this with WordPress.com
Get started