Let’s continue with the project where we created a list and few site columns. We have added those site columns in list using Content Type.
We will now create a workflow on addition or modification of list item, an email will be sent to the mentioned recipients.
Right click on project name in Solution Explorer and add a New Folder. Name that folder Workflows.
Right click on Workflows folder, Add –> New Item –> Name it as AddCM_WF.
On the next page, choose the default settings and click Next.

Choose the lists to associate with Workflow. Click Next.

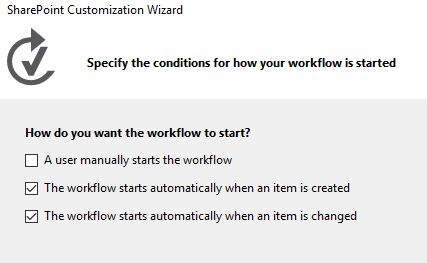
Choose the workflow to start when the item added and changed. Click Finish.
After this, you can see three new items added in the project:
- AddCM_WF which has workflow.xaml file that is open in Workflow Designer
- WorkflowHistoryList list instance where tasks that are part of the workflow are created and updated.
- WorkflowTaskList list instance which is a log of the various steps in each execution of the workflow as they occur.
Drag the two list instances in the Lists folder.
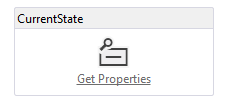
Make sure workflow.xaml file is open. We will be designing our workflow into this with the help of Toolbox. Open Toolbox pane –> SP-List node. Drag LookupSPListItem into the Sequence in the workflow designer.
Go the Properties window and set the following values:
- ItemID: (current item)
- ListID: (current list)
- DisplayName: CurrentState

It will look like this
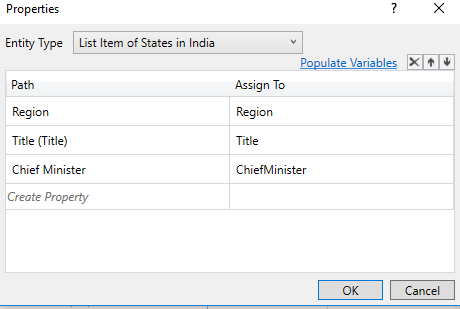
Click on Get Properties, it will add another activity GetDynamicValueProperties to the sequence. Select Define… This will open a Properties dialog box. After filling the values, remember to click on Populate Variables. This will create variables Region, Title and ChiefMinister and assigns each of the values of the corresponding fields in the current item of States in India list. Once done, click OK.
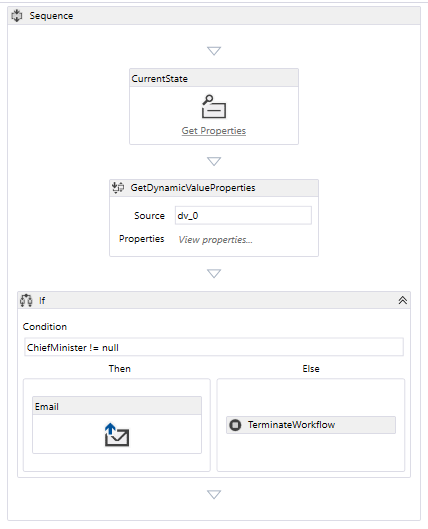
Open Control Flow node in Toolbox, drag If in sequence. In condition, enter ChiefMinister != null. From SP-Utilities node, drag Email activity in Then box. You can enter values in To, Body and Subject of Email in Properties window. For BCC, CC, and To fields, you can write a string collection in the form of new System.Collections.ObjectModel.Collection() {“EmailID1”, “EmailID2”,…..}

Expand Runtime node in Toolbox and drag TerminateWorkflow in Else box. In the Properties pane, write “Chief Minister not assigned to ” + Title + ” state!” in Reason property.
Final workflow should look like below:
Press F5 and test the workflow.
