Below are the steps to create SharePoint-Hosted Add-in using Visual Studio. I am using Visual Studio 2013 Ultimate. The UI of Visual Studio may vary on your version of Visual Studio. Make sure you are using Visual C# as the language and chosen .NET Framework 4.5.
In this add-in, we will create a list, few custom columns (not site columns) and add some data into it.
Start Visual Studio as Run as Administrator. This is important.
Select New Project –> App for SharePoint 2013. Name the project as CountryStatesSHA. Click OK.

Specify the full Developer Site URL that you want to use to debug your add-in. Make sure to use HTTPS and not HTTP. Select SharePoint-hosted to host your add-in.

You might be prompted to enter your credentials. Use your Office 365 subscription credential to sign in.
You will see Default.aspx file when the project is opened. In PlaceHolderPageTitleInTitleArea, title of the Page should come. In PlaceHolderMain, the main body of the page will be mentioned. In the Content control, all CSS and JavaScript file references will be mentioned.
Make sure you have below code in Content control exactly in the same order.
/_layouts/15/sp.runtime.js
/_layouts/15/sp.js
<meta name="WebPartPageExpansion" content="full" />
In Solution Explorer, open AppManifest.xml file in designer mode. Change the Title to Country and States. Make sure not to change Name field. Save and Close file.

Right click the Project Name (CountryStatesSHA) in Solution Explorer, click Add –> New Folder. Name the folder as Lists. We can place all the lists that we create in an add-in in this folder. As of now we are creating only one list.
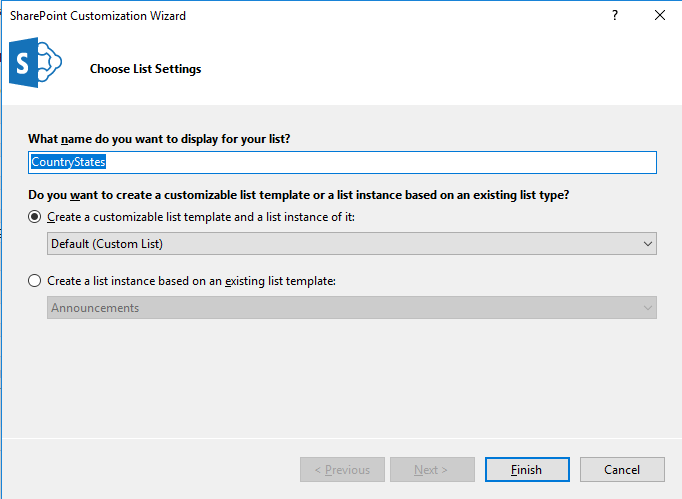
Right click on newly created folder Lists –> Add –> New Item –> List. Name this as CountryStates. Click Add. Leave the List Settings as it is and click Finish.
This will create a CountryStates list template with a child list instance.
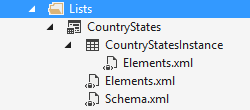
We have two elements.xml files one each for list template and list instance. Open elements.xml file of CountryStates list template. Add a space to DisplayName attribute to make it friendlier, say “Country States”. Do NOT make any changes to Name attribute. Change the Description attribute to “List of States in a Country”. Save and close the file.

Open the Designer view of list instance, CountryStatesInstance, by clicking it on Solution Explorer. This shows various settings of List Instance. Open the List Change the Title to “States in India”, List URL to “Lists/IndiaStates” and Description to “List of States in India”. If you want to display this list on Quick Launch bar, keep Display list at Quick Launch checkbox checked. Save and close.

Change the List Instance Name in Solution Explorer from “CountryStatesInstance” to “IndiaStates”.
Open schema.xml file. The changes that you made to this file will be applied to all the instances of this list template.
In the Fields element, add below XML. This is to create a new Field in the list.
<Field ID="{64CD20B8-6CC6-4B69-A171-34CD6E4ACEFC}" Name="Code" DisplayName="Code" Type="Text" Required="TRUE"/>
In the View element whose BaseViewID value is “0”, replace the existing ViewFields element with the following markup (use exactly this GUID for the FieldRef named Title).
<ViewFields>
<FieldRef Name="Title" ID="{fa564e0f-0c70-4ab9-b863-0177e6ddd247}" DisplayName="State" />
</ViewFields>
Still in the schema.xml file, in the View element whose BaseViewID value is “1”, replace the existing ViewFields element with the following markup (use exactly this GUID for the FieldRef named LinkTitle). This is to add the fields in the default view.
<ViewFields>
<FieldRef Name="LinkTitle" ID="{82642ec8-ef9b-478f-acf9-31f7d45fbc31}" DisplayName="State" />
<FieldRef Name="Code" ID="{64CD20B8-6CC6-4B69-A171-34CD6E4ACEFC}" DisplayName="Code" />
</ViewFields>
Let’s populate some data in our list instance. Open elements.xml file of IndiaStates list instance. Add the markup as a child element of the ListInstance Your elements.xml should look like below. You can add as many as rows you want.

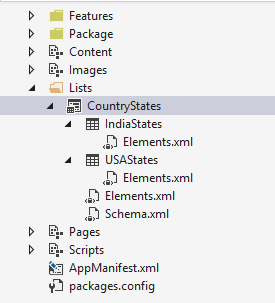
f you want to create another list instance with the same list template, right click on the list template name (CountryStates) in Solutions explorer –> Add –> New Item. Select List and name it as USAStates.
Select Create a list instance based on an existing list template.

Your Solution Explorer will look like this. This list will have the basic settings of CountryStates list template, but you can add other settings based on your requirement.
Expand Features folder, double click Rename the title of the feature to “Lists and other components” and Description to “Feature to add lists and other components”. Make sure that our lists and list instances are placed in Items in the feature column.
Rename the Feature1 in Solution Explorer as well to CountryStatesFeature.
Open Default.aspx. In PlaceHolderPageTitleInTitleArea area, replace Page Title with “Country and States”.
In PlaceHolderMain area, replace the content with following:
<p>
<asp:HyperLink runat="server" NavigateUrl="JavaScript:window.location = _spPageContextInfo.webAbsoluteUrl + '/Lists/IndiaStates/AllItems.aspx';"
    Text="States in India" /> </br>
<asp:HyperLink runat="server" NavigateUrl="JavaScript:window.location = _spPageContextInfo.webAbsoluteUrl + '/Lists/USAStates/AllItems.aspx';"
    Text="States in USA" />
</p>
Run the Add-in by pressing F5 or Start button on the toolbar. This is a temporary installation to test and debug the add-in. NOTE that whenever you make any changes in an add-in, increase the version number in AppManifest.xml and the deploy the app.
When the Default.aspx loads, it will look like this. See the URL of the page,

Click on States in India link to open the list and see the contents.

