CRUD Operations using JavaScript In SharePoint-Hosted Add-In (ListItems)

You can either continue this article or use the below code in your own way.

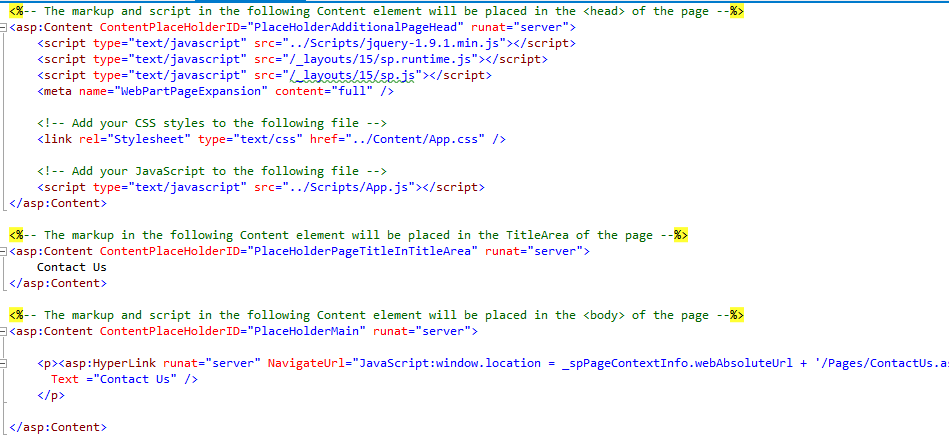
Below are functions to perform CRUD Operations on List Items using JavaScript through SharePoint-Hosted Add-in. This code is embedded in App.js file.

var hostWebUrl;
var appWebUrl;
var ctx ;
var appCtxSite;
var web;

$(document).ready(function () {
    hostWebUrl = decodeURIComponent(manageQueryStringParameter('SPHostUrl'));
    appWebUrl = decodeURIComponent(manageQueryStringParameter('SPAppWebUrl'));
    ctx = new SP.ClientContext(appWebUrl);
    appCtxSite = new SP.AppContextSite(ctx, hostWebUrl);
    web = appCtxSite.get_web();
   
    deleteItem();
});

// Create a new Item in a List
function createListItem() {
    var list = web.get_lists().getByTitle('My Contacts');
    var itemInfo = new SP.ListItemCreationInformation();
    this.newItem = list.addItem(itemInfo);
    newItem.set_item('Title', 'Gupta');
    newItem.set_item('FirstName', 'Rahul');
    newItem.update();
    ctx.load(newItem);
    ctx.executeQueryAsync(
        Function.createDelegate(this,this.onCreateListItemSuccess),
        Function.createDelegate(this, this.onFail));
}

// Success method of createListItem
function onCreateListItemSuccess() {
    alert('Item added successfully!');
}

// Update an Item of a List
function updateItem() {
    var list = web.get_lists().getByTitle('My Contacts');
    var listItem = list.getItemById(2);
    listItem.set_item('Title', 'Mittal');
    listItem.update();

    ctx.load(listItem);
    ctx.executeQueryAsync(
        Function.createDelegate(this, this.onUpdateItemSuccess),
        Function.createDelegate(this, this.onFail));
}

// Success methos of updateItem
function onUpdateItemSuccess() {
    alert('Item Updated Successfully!');
}

// Delete an Item frm a List
function deleteItem() {
    var list = web.get_lists().getByTitle('My Contacts');
    var listItem = list.getItemById(2);
    listItem.deleteObject();

    ctx.executeQueryAsync(
        Function.createDelegate(this, this.onDeleteItemSuccess),
        Function.createDelegate(this, this.onFail));
}

// Success method of deleteItem
function onDeleteItemSuccess() {
    alert('Item Deleted Successfully!');
}

// Retrieve all the list items
function getListItems() {
    var list = web.get_lists().getByTitle("My Contacts");
    var camlQuery = new SP.CamlQuery();
    camlQuery.set_viewXml(
        '<View><Query><Where><Geq><FieldRef Name=\'ID\'/>' +
        '<Value Type=\'Number\'>1</Value></Geq></Where></Query>' +
        '<Rowlimit>10</Rowlimit></View>');
    this.itemColl = list.getItems(camlQuery);
    ctx.load(this.itemColl);
    ctx.executeQueryAsync(Function.createDelegate(this, this.onGetListItemsSuccess), Function.createDelegate(this, this.onFail));
}

// Success method of getListItems function
function onGetListItemsSuccess() {
    var listItem = '';
    var listEnumerator = this.itemColl.getEnumerator();
    while (listEnumerator.moveNext()) {
        var currentItem = listEnumerator.get_current();
        listItem += '\nLast Name: ' + currentItem.get_item('Title') +
            '\nFirst Name: ' + currentItem.get_item('FirstName');
    }
    alert(listItem.toString());
}
// function to manage the query string parameters and return SPHostURL or SPAppWebUrl as per the request.
function manageQueryStringParameter(paramToRetrieve) {
    var params =
    document.URL.split("?")[1].split("&");
    var strParams = "";
    for (var i = 0; i < params.length; i = i + 1) {
        var singleParam = params[i].split("=");
        if (singleParam[0] == paramToRetrieve) {
            return singleParam[1];
        }
    }
}

// generic Fail method
function onFail() {
    alert("Failed!" + arguments[1].get_message());
}

CRUD Operations using JavaScript in SharePoint-Hosted Add-In (Lists)

You can either continue this article or use the below code in your own way. This code is written in Apps.js file.

Below are the sample JavaScript codes for lists operations:

var hostWebUrl;
var appWebUrl;
var ctx ;
var appCtxSite;
var web;

$(document).ready(function () {
    hostWebUrl = decodeURIComponent(manageQueryStringParameter('SPHostUrl'));
    appWebUrl = decodeURIComponent(manageQueryStringParameter('SPAppWebUrl'));
    ctx = new SP.ClientContext(appWebUrl);
    appCtxSite = new SP.AppContextSite(ctx, hostWebUrl);
    web = appCtxSite.get_web();
    getAllLists();
});

// function to delete a list
function deleteList() {
    var list = web.get_lists().getByTitle('My Contacts');
    list.deleteObject();
    ctx.executeQueryAsync(
        Function.createDelegate(this, function () { alert("List deleted successfully");}),
        Function.createDelegate(this, this.onFail));
}

//function to update an existing list
function updateList() {
    var list = web.get_lists().getByTitle('My Contacts');
    list.set_description('My Personal Contacts');
    list.update();
    ctx.load(list);
    ctx.executeQueryAsync(Function.createDelegate(this, function () {
        alert("Title: " + list.get_title() + " , Description: " + list.get_description());
    }), Function.createDelegate(this, this.onFail));
}

// function to create new list in the host web 
function createList()
{
    var listInfo = new SP.ListCreationInformation();
    listInfo.set_title('My Contacts');
    listInfo.set_templateType(SP.ListTemplateType.contacts);
    this.list = web.get_lists().add(listInfo);
    ctx.load(list);
    ctx.executeQueryAsync(
        Function.createDelegate(this, function () {
            alert(this.list.get_title() + " new list created!");
        }),
        Function.createDelegate(this, this.onFail));
}

// function to get all List names in the host web
function getAllLists() {
    this.listColl = web.get_lists();
    ctx.load(this.listColl);
    ctx.executeQueryAsync(
        Function.createDelegate(this, this.onGetAllListsSucceed),
        Function.createDelegate(this, this.onFail));
}

// success method of getAllLists function
function onGetAllListsSucceed() {
    //var list = '';
    var listEnumerator = this.listColl.getEnumerator();
    while(listEnumerator.moveNext()){
        var list = listEnumerator.get_current();
        document.getElementById("message").innerHTML = document.getElementById("message").innerHTML + list.get_title() + "</br>";
    }
}

// generic Fail method
function onFail()
{
    alert("Failed!" + arguments[1].get_message());
}

// function to get the specific list properties
function getSpecificListProperties() {
    this.listColl = web.get_lists();
    ctx.load(listColl, 'Include(Title, Id)');
    ctx.executeQueryAsync(
        Function.createDelegate(this, this.onGetSelectedListProperties),
        Function.createDelegate(this, this.onFail));
}

// success method of getSpecificListProperties function
function onGetSelectedListProperties()
{
    var listEnumerator = this.listColl.getEnumerator();
    while (listEnumerator.moveNext()) {
        var list = listEnumerator.get_current();
        document.getElementById("message").innerHTML = document.getElementById("message").innerHTML +
            list.get_title() + " -- " + list.get_id().toString() + "</br>";
    }
}

// function to manage the query string parameters and return SPHostURL or SPAppWebUrl as per the request.
function manageQueryStringParameter(paramToRetrieve) {
    var params =
    document.URL.split("?")[1].split("&");
    var strParams = "";
    for (var i = 0; i < params.length; i = i + 1) {
        var singleParam = params[i].split("=");
        if (singleParam[0] == paramToRetrieve) {
            return singleParam[1];
        }
    }
}

CRUD Operations using JavaScript in SharePoint-Hosted Add-in (Web)

Below are the steps for CRUD operations using JavaScript in SharePoint-Hosted Add-In for Web.

Create a new project in Visual Studio –> Apps for SharePoint. Name it as JavaScriptCRUD.

Enter the URL of your developer site and select SharePoint-Hosted.

Expand Scripts in Solution Explorer and open Apps.js from there. Delete everything from the file.

Modify App Permissions in AppManifest.xml file. Open it in Designer mode. In Permissions tab, give Full Control access to Site Collection.

Write the below code in App.js file.

var hostWebUrl;
var appWebUrl;

$(document).ready(function () {
    hostWebUrl = decodeURIComponent(manageQueryStringParameter('SPHostUrl'));
    appWebUrl = decodeURIComponent(manageQueryStringParameter('SPAppWebUrl'));

    // calling Javascript function
    getWebDetails();
});

function manageQueryStringParameter(paramsToReceive) {
    var params = document.URL.split("?")[1].split("&");
    var strParams = "";
    for (var i = 0; i < params.length; i++) {
        var singleParam = params[i].split("=");
        if (singleParam[0] == paramsToReceive) {
            return singleParam[1];
        }
    }
}

There are two components in SharePoint-Hosted Add-In: Host Web and Add-In Web (previously referred as App Web).

Host Web contains the details of the site where the add-in is hosted. We can get the URL of Host Web from SPHostUrl component of query string.
Add-in web contains the components of Add-in like lists, libraries, pages etc. We get the URL of Add-in web from SPAppWebUrl component of the query.

When we use SP.ClientContext.get_current(), we get the context and URL of the Add-in and not the host web.

Below are the sample codes related to Web using JavaScript

Get all the Web Properties

function getWebDetails()
{
    var context = new SP.ClientContext(appWebUrl);
    var appContextSite = new SP.AppContextSite(context, hostWebUrl);
    var web = appContextSite.get_web();
    context.load(web);
    context.executeQueryAsync(Function.createDelegate(this, function () {
        alert(web.get_title()),
        Function.createDelegate(this, function () { alert("Fail!") })
    })); 
}

There is another way of writing code. We can write success and failure functions of executeQueryAsync separately.

Get selected Web Properties

function getSelectedWebDetails() {
    var context = new SP.ClientContext(appWebUrl);
    var appContextSite = new SP.AppContextSite(context, hostWebUrl);
    this.web1 = appContextSite.get_web();
    context.load(this.web1,'Title','Description');
    context.executeQueryAsync(Function.createDelegate(this, this.onSuccessGetWebDetails),
        Function.createDelegate(this, this.onFailGetWebDetails));
}

function onSuccessGetWebDetails()
{
    document.getElementById("message").innerHTML = "<b>Title:</b> " + this.web1.get_title() +
        " </br><b>Description:</b> " + this.web1.get_description(); }

function onFailGetWebDetails() {
    alert("Failes!");
}

Update Web Properties

function updateWebDetails() {
    var context = new SP.ClientContext(appWebUrl);
    var appContextSite = new SP.AppContextSite(context, hostWebUrl);
    this.web1 = appContextSite.get_web();
    this.web1.set_description("New Description");
    this.web1.update();
    context.load(this.web1,'Title','Description');
    context.executeQueryAsync(Function.createDelegate(this, this.onSuccessGetWebDetails),
        Function.createDelegate(this, this.onFailGetWebDetails));
}

Add a Custom Ribbon Button in SharePoint List using SharePoint-Hosted Add-In

Let’s continue with the project where we created a list and add few site columns using custom content type.

In this article, we will add a custom action button in the Ribbon menu in Events tab of a Calendar list. With the click of this button, we will be navigated to a list.

Create an Event List Calendar in host web (Developer Site) named Meetings.

Add an event in calendar. Calendar should look like below:

In Solution Explorer, right click project name –> Add –>New Item –> Office/SharePoint –> Ribbon Custom Action. Name it as OpenIndiaStates.

In this page, select Host Web, List Instance and Meetings in respective options. Click Next.

We will now specify where we want the button to be placed on the ribbon.

We can either choose the values from the dropdown or enter our own value. We want the button to be placed in the Calendar list –> Events tab –> Actions Group. Hence, we will write Calendar.Events.Actions.Controls._children.

Press F5 and test the App.

It will open the app with the lists. Navigate to your Developer Site. Open Meetings List. In Events tab, click on button that you have created.

You will be navigated to States in India list.

Add a Custom Page and style to SharePoint-Hosted Add-in

There are times when we need to add various pages in our Add-In and style them as per our needs. Below is an example on how to add a custom ASPX page and style it as per our requirement.

Open Visual Studio and create a new Project with template Apps for SharePoint. Name it as CustomPageStyle.

Give the URL of your Developer Site on which you want to test your add-in and choose SharePoint-Hosted.

In Solution Explorer, you have a Default.aspx page already available. This is the default page that is displayed when the add-in is loaded. You can modify this page or add a new page. Let’s add a new page in this example.

Right click on Pages in Solution Explorer –> Add –> New Item –> Page. Name it as ContactUs.aspx.

This is how a custom ContactUs.aspx page looks by default.

You can see that there is Head and Main area, but no Title area. Let’s add a Title area (below code) between Head and Main.

<asp:Content ContentPlaceHolderID="PlaceHolderPageTitleInTitleArea" runat="server">
    Contact Us
</asp:Content>

For the CSS styling, you can add your own CSS file or embed your code in existing app.css file. Let’s put our code in app.css file only. As of now, we will link app.css with our new page. Put the below code in <asp:Content> element with ContentPlaceHolderId = PlaceHolderAdditionalPageHead.

<link rel="Stylesheet" type="text/css" href="../Content/App.css" />

In <asp:Content> element with ContentPlaceHolderId = PlaceHolderMain, remove all the code and write the below code there:

    <h3>Contact Us:</h3>
    <p>Tutorials4SharePoint, 156/7, Connaught Place, New Delhi</p>
    <p>+91 9999999999</p>
    <p>https://tutorials4sharepoint.wordpress.com/</p>

Default.aspx page is the landing page for our add-in. Let’s add a link on Default.aspx page to navigate to our new custom page. Add the below markup in <asp:Content> element with ContentPlaceHolderId = PlaceHolderMain

<p><asp:HyperLink runat="server" NavigateUrl="JavaScript:window.location = _spPageContextInfo.webAbsoluteUrl + '/Pages/ContactUs.aspx';"
    Text="Contact Us" />
</p>

Open app.css file and add the following line in the file. You can write any CSS code here.

p {color:darkgreen;}

Change the AppManifest.xml as per below screenshot:

Final Default.aspx page will look like:

Final ContactUs.aspx page will look like:

Press F5 and test the code. You will see Deafult.aspx as the landing page of the add-in.

Click on Contact Us link at the bottom of the logo, you will be navigated to our ContactUs custom page.


Create List Workflow using SharePoint-Hosted Add-In

Let’s continue with the project where we created a list and few site columns. We have added those site columns in list using Content Type.

We will now create a workflow on addition or modification of list item, an email will be sent to the mentioned recipients.

Right click on project name in Solution Explorer and add a New Folder. Name that folder Workflows.

Right click on Workflows folder, Add –> New Item –> Name it as AddCM_WF.

On the next page, choose the default settings and click Next.

Choose the lists to associate with Workflow. Click Next.

Choose the workflow to start when the item added and changed. Click Finish.

After this, you can see three new items added in the project:

  • AddCM_WF which has workflow.xaml file that is open in Workflow Designer
  • WorkflowHistoryList list instance where tasks that are part of the workflow are created and updated.
  • WorkflowTaskList list instance which is a log of the various steps in each execution of the workflow as they occur.

Drag the two list instances in the Lists folder.

Make sure workflow.xaml file is open. We will be designing our workflow into this with the help of Toolbox. Open Toolbox pane –> SP-List node. Drag LookupSPListItem into the Sequence in the workflow designer.

Go the Properties window and set the following values:

  • ItemID: (current item)
  • ListID: (current list)
  • DisplayName: CurrentState

It will look like this

Click on Get Properties, it will add another activity GetDynamicValueProperties to the sequence. Select Define… This will open a Properties dialog box. After filling the values, remember to click on Populate Variables. This will create variables Region, Title and ChiefMinister and assigns each of the values of the corresponding fields in the current item of States in India list. Once done, click OK.

Open Control Flow node in Toolbox, drag If in sequence. In condition, enter ChiefMinister != null. From SP-Utilities node, drag Email activity in Then box. You can enter values in To, Body and Subject of Email in Properties window. For BCC, CC, and To fields, you can write a string collection in the form of new System.Collections.ObjectModel.Collection() {“EmailID1”, “EmailID2”,…..}

Expand Runtime node in Toolbox and drag TerminateWorkflow in Else box. In the Properties pane, write “Chief Minister not assigned to ” + Title + ” state!” in Reason property.

Final workflow should look like below:

Press F5 and test the workflow.

Add Custom Content Types using SharePoint-Hosted Add-in

Here is the link to start creating your SharePoint-Hosted Add-in. We will create list template and instance through this link.

Here are the steps to create Site Columns. Follow the steps till creation of Site columns. DO NOT add the Site Columns directly to list.

Below are the steps to create Content Type, add Site Columns to this Content Type and attach this Content Type to the list template.

It is always a best practice to create folders in the solution and keep the similar files together.


Right click on the Project Name in Solution Explorer and add a New Folder. Name it as Content Types.

Right click on Content Types folder, Add –> New Item –> Content Type. Name it as CountryStatesCT.

Choose base content type as Click Finish.

CountryStatesCT Designer should open. Add the site columns.

Make the changes to the Name, Description and Group name of the Content type. Clear all the check boxes if required.

Open Elements.xml of your content type and add following xml:

<FieldRef ID="{fa564e0f-0c70-4ab9-b863-0177e6ddd247}" DisplayName="Title" Required="TRUE" Name="Title" />
<FieldRef ID="{64CD20B8-6CC6-4B69-A171-34CD6E4ACEFC}" DisplayName="Code" Required="false" Name="Code" />

It should look like below:

Let’s add this Content Type to our list template. Open designer view of CountryStates List Template. Click on Content Type button at the bottom.

Select CountryStates Content Type and make it as the default content type by selecting it and click on Set as Default.

After this, you will see all the Site Columns listed in the column list of List Template.

Verify the schema.xml

Press F5 to test the add-in.

Here are the steps to Deploy and Install the SharePoint-Hosted Add-in.

How to Deploy and Install SharePoint-Hosted Add-in

We have created a SharePoint-Hosted Add-in, Country and States. Here are the steps to create it.

Below are the steps to Deploy and Install SharePoint-Hosted Add-ins.

Create App Catalog. Here is a link to create App Catalog.

Package the Add-in and upload it to App Catalog.

Open your project in Visual Studio,right click the project in Solution Explorer and click Publish.

Click Package the App. You can also see “Package the add-in” button depending on the version of Visual Studio.

An .app file will be created and stored in the solution’s bin\Debug\app.publish\app-version-number.

Open App Catalog and select Apps for SharePoint (or SharePoint Add-ins as per your SharePoint version) on Quick Launch bar. Upload the .app file in this library.

Install the add-in

Go to your site collection. SettingsAdd an App  From your organization. Click on your App.

Trust your Add-in

Site Contents page will automatically open showing that your add-in is still installing. You can see it in grey color as well. Once done, you can click it and start using it. You will not be able to see your lists separately in your site and can access then only via your add-in.

Create Lists and custom columns in SharePoint-Hosted Add-In

Below are the steps to create SharePoint-Hosted Add-in using Visual Studio. I am using Visual Studio 2013 Ultimate. The UI of Visual Studio may vary on your version of Visual Studio. Make sure you are using Visual C# as the language and chosen .NET Framework 4.5.
In this add-in, we will create a list, few custom columns (not site columns) and add some data into it.

Start Visual Studio as Run as Administrator. This is important.

Select New Project –> App for SharePoint 2013. Name the project as CountryStatesSHA. Click OK.

Specify the full Developer Site URL that you want to use to debug your add-in. Make sure to use HTTPS and not HTTP. Select SharePoint-hosted to host your add-in.

You might be prompted to enter your credentials. Use your Office 365 subscription credential to sign in.

You will see Default.aspx file when the project is opened. In PlaceHolderPageTitleInTitleArea, title of the Page should come. In PlaceHolderMain, the main body of the page will be mentioned. In the Content control, all CSS and JavaScript file references will be mentioned.

Make sure you have below code in Content control exactly in the same order.

/_layouts/15/sp.runtime.js
/_layouts/15/sp.js
<meta name="WebPartPageExpansion" content="full" />

In Solution Explorer, open AppManifest.xml file in designer mode. Change the Title to Country and States. Make sure not to change Name field. Save and Close file.

Right click the Project Name (CountryStatesSHA) in Solution Explorer, click Add –> New Folder. Name the folder as Lists. We can place all the lists that we create in an add-in in this folder. As of now we are creating only one list.

Right click on newly created folder Lists –> Add –> New Item –> List. Name this as CountryStates. Click Add. Leave the List Settings as it is and click Finish.

This will create a CountryStates list template with a child list instance.

We have two elements.xml files one each for list template and list instance. Open elements.xml file of CountryStates list template. Add a space to DisplayName attribute to make it friendlier, say “Country States”. Do NOT make any changes to Name attribute. Change the Description attribute to “List of States in a Country”. Save and close the file.

Open the Designer view of list instance, CountryStatesInstance, by clicking it on Solution Explorer. This shows various settings of List Instance. Open the List Change the Title to “States in India”, List URL to “Lists/IndiaStates” and Description to “List of States in India”. If you want to display this list on Quick Launch bar, keep Display list at Quick Launch checkbox checked. Save and close.

Change the List Instance Name in Solution Explorer from “CountryStatesInstance” to “IndiaStates”.

Open schema.xml file. The changes that you made to this file will be applied to all the instances of this list template.

In the Fields element, add below XML. This is to create a new Field in the list.

<Field ID="{64CD20B8-6CC6-4B69-A171-34CD6E4ACEFC}" Name="Code" DisplayName="Code" Type="Text" Required="TRUE"/>

In the View element whose BaseViewID value is “0”, replace the existing ViewFields element with the following markup (use exactly this GUID for the FieldRef named Title).

<ViewFields>
<FieldRef Name="Title" ID="{fa564e0f-0c70-4ab9-b863-0177e6ddd247}" DisplayName="State" />
</ViewFields>

Still in the schema.xml file, in the View element whose BaseViewID value is “1”, replace the existing ViewFields element with the following markup (use exactly this GUID for the FieldRef named LinkTitle).  This is to add the fields in the default view.

<ViewFields>
<FieldRef Name="LinkTitle" ID="{82642ec8-ef9b-478f-acf9-31f7d45fbc31}" DisplayName="State" />
<FieldRef Name="Code" ID="{64CD20B8-6CC6-4B69-A171-34CD6E4ACEFC}" DisplayName="Code" />
</ViewFields>

Let’s populate some data in our list instance. Open elements.xml file of IndiaStates list instance. Add the markup as a child element of the ListInstance Your elements.xml should look like below. You can add as many as rows you want.

f you want to create another list instance with the same list template, right click on the list template name (CountryStates) in Solutions explorer –> Add –> New Item. Select List and name it as USAStates.

Select Create a list instance based on an existing list template.

Your Solution Explorer will look like this. This list will have the basic settings of CountryStates list template, but you can add other settings based on your requirement.

Expand Features folder, double click Rename the title of the feature to “Lists and other components” and Description to “Feature to add lists and other components”. Make sure that our lists and list instances are placed in Items in the feature column.

Rename the Feature1 in Solution Explorer as well to CountryStatesFeature.

Open Default.aspx. In PlaceHolderPageTitleInTitleArea area, replace Page Title with “Country and States”.

In PlaceHolderMain area, replace the content with following:

<p>
<asp:HyperLink runat="server" NavigateUrl="JavaScript:window.location = _spPageContextInfo.webAbsoluteUrl + '/Lists/IndiaStates/AllItems.aspx';"
    Text="States in India" /> </br>
<asp:HyperLink runat="server" NavigateUrl="JavaScript:window.location = _spPageContextInfo.webAbsoluteUrl + '/Lists/USAStates/AllItems.aspx';"
    Text="States in USA" />
</p>

Run the Add-in by pressing F5 or Start button on the toolbar. This is a temporary installation to test and debug the add-in. NOTE that whenever you make any changes in an add-in, increase the version number in AppManifest.xml and the deploy the app.
When the Default.aspx loads, it will look like this. See the URL of the page,

Click on States in India link to open the list and see the contents.

Power Platform Academy

Start or Upgrade your Career with Power Platform

Learn with Akanksha

Python | Azure | AI/ML | OpenAI | MLOps

Design a site like this with WordPress.com
Get started